

No-Oil Whole Wheat Bread for Bread Machines
There are many bread recipes out there, and I haven’t tried them all. However, this is one I have, and I liked it alot! I’ve made it so super easy to make bread (just dump in the ingredients, and spend 5 minutes later on to knead and separate dough into two loaves, finally baking!)
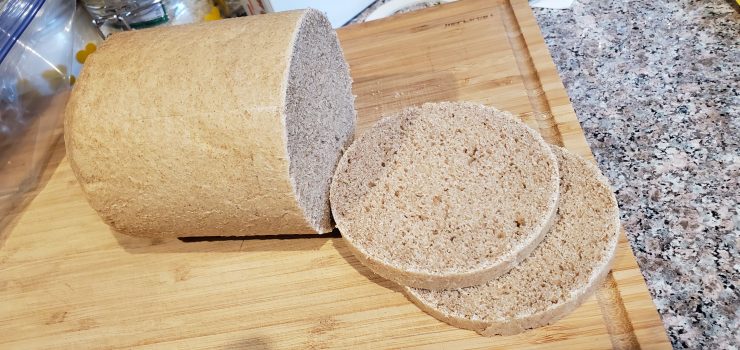
On Amazon, I recently purchased a bread machine for very little money. While I like this machine (and even my first attempt was a success), the 2 lb. bread loaf dimensions seem unsuitable for making a sandwich that would fit in a regular sandwich bag, and the slice size is rather large for toast, too. Cutting in half made things too small.

The size of the loaves is unruly, with a half, above, being almost too small, but the full loaf being too large.
So, I set about to solve the problem, using some solutions from others! This recipe has been modified from the original author to suit my needs! See my notes after the recipe for more information!

No-Oil Whole Wheat Bread for 2-lb. Bread Machines
Equipment
- 2 cans from 46 oz. pineapple juice with one side cut off.
- 2 lb bread machine
Ingredients
- 1 ⅔ cups aquafaba also known as chick-pea broth, or water could be used.
- 2 ⅔ cups whole wheat flour
- 2 cups bread flour
- 2 tablespoons vital wheat gluten or high gluten flour optional, but highly recommended. (If you had to, you could also substitute with more bread flour.)
- 2 tablespoons sugar
- 1 teaspoon salt 1 ½ tsp. if water is used
- 2 teaspoon active dry yeast
Instructions
- Pour the aquafaba into the bread machine pan, attempting very accurate and precise measurements. A glass or clear plastic measuring cup is best, to get just up to the intended line.
- Stir flour before measuring. Overfill measuring cup by spooning flour in, and then level off with knife before adding to bread machine pan. Don't scoop up flour with measuring cup.
- Add the remaining ingredients. Make sure the yeast doesn’t come into contact with the liquid by placing it in a shallow dip (created with a spoon or your finger!) at the top of the ingredients.
- Choose the dough setting on the bread machine, unless you want to bake in your bread machine, and press start.
- If baking in the bread machine, choose whole wheat setting, and wait for the cycle to complete! Fresh bread!
- After the initial dough program is complete, pre-heat oven to 200°F.
- Remove dough from bread machine and place on a lightly-floured surface, knead gently a couple of times, and then split into 1-lb. balls. (I use a kitchen scale to weigh mine and split.)
- Place dough into pineapple juice cans, lined with Teflon sheets. (See post below recipe.)
- Place cans into 200°F oven, turning OFF the oven. Let rise for 50 minutes to 1 hr.
- Bake at 350°F over for 40 to 50 minutes, until golden brown on top.
- Remove cans from oven, cool slightly, and dump bread out to cool completely.
Notes
- Make sure all ingredients are at room temperature.
- Really do get some vital wheat gluten, or high-gluten flour. Bob’s Red Mill “Vital Wheat Gluten” is what I’ve been using lately, but even the generic brands will do. This really helps the bread have some sponge, and bend, instead of breaking and crumbling easily. It’s really worth it! I’ve also now doubled the amount of vital wheat gluten to 2 Tablespoons (and I often have more rounded Tablespoons than precise, flat ones.)
- Bread will slice better after it’s cooled.
- Around here, bread lasts about a week on the counter in a sealed bag. But, it also freezes very well, or store in the refrigerator.
Bread in a can? Am I crazy? Actually, this method works very well.
Here’s what you do:
- Purchase 2 46 oz. pineapple juice cans. Wal-Mart has them, or many grocery stores, (or any can of this size, although they seem to be becoming more rare.) I can find them for $2-3 each.
- Use your can-opener to completely remove the top, and drink the juice, use it as a base for fruit smooties, or use it to pre-treat your fruit before dehydrating! (Bananas taste great after drying when pre-treated with the pineapple juice.)
- Purchase some Teflon baking sheets. The link has some that I found for incredibly cheap. I use them in the bottom of ALL my baking sheets and pans now (in fact, they live in the pans, even when not in use.) These Teflon sheets easily cut to size with just scissors. I cut a flat sheet to use around the edges of my cans, and also traced the can for the bottom, and cut out a circle.
- Simply place the 1-lb dough balls in the bottom of the cans, lined with the Teflon sheets. I don’t press it in tightly, but do help it conform to the can a bit. Let dough rise in the slightly heated oven (now turned off) to about double or more the original size, and then bake.
- When you remove the cans from the oven after baking, the bread will just almost fall out of the can (with a bit of shaking), and there is almost no cleanup, as you can simply wipe the Teflon sheets down, and store away for the next time!
Best of all, this round bread is perfect for sandwiches, or toast, or even a plant-based “burger” patty!


This could have baked another 5-10 minutes to get even darker, but for those in the “no-crust” crowd, these were perfect.