Plant-based Garden Cream Cheese Spread

Plant-based Garden Cream Cheese Spread

Jenn, over at Veggie Inspired has a great recipe for a Veggie Cream Cheese Spread, that, the moment I saw it, I knew I had to try it! It contained all kinds of things that sounded great and like they’d work well together. But, nothing screamed “cream cheese” to me, so I figured I’d like what I made, but not think it was cream cheese.

I. Was. So. Wrong!

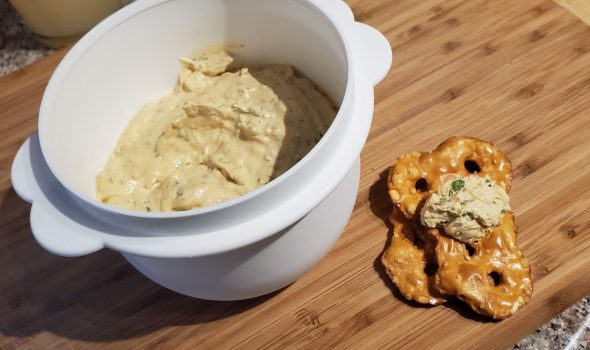
I’m not sure what is in Jenn’s recipe that gives it the flavor it does, but if I had to guess, it’s that apple cider vinegar, and lemon juice. In fact, the recipe reeks of the ACV all the way through, and, to me, smells rather nasty. But, by the time you add all the veggies at the end, and let it sit overnight in the refrigerator (if you can wait that long), it’s nothing short of amazing, and just what I remember a good garden cream cheese spread should taste like! Combined with some Pretzel Crisps, it makes an incredible summer afternoon snack!

Check out Jenn’s recipe here (if you haven’t already clicked, had your mouth start watering, and forgotten about me!)

Or, find below, almost verbatim, with my modifications and notes:

Plant-based Garden Cream Cheese Spread (Dairy Free)

Creamy and tangy with bits of fresh veggies throughout, this dairy free cream cheese is perfect on bagels or toast, as a spread in sandwiches or wraps, or as a dip for crackers or raw vegetables.
Prep Time12 hours
Course: Breakfast, Breakfast, Dip, Sauce/Spread, Sauce/Spread
Servings: 16 people
Author: Jenn Sebestyen @ VeggieInspired.com

Ingredients

  • 1 ½ cups raw cashews soaked in water for several hours or overnight, drained and rinsed (Or not. See PBB Notes below.)
  • 1 tbsp apple cider vinegar
  • 2 tbsp fresh lemon juice
  • 1 tsp salt
  • ½ tsp onion powder
  • ½ tsp paprika
  • ¼ tsp garlic powder
  • 2-3 tbsp water
  • ¼ cup shredded carrots
  • ¼ cup diced bell pepper Orange, red, yellow or green, or all four!
  • 2 tbsp diced green onion
  • 2 tbsp chopped fresh parsley
  • 1 tbsp chopped fresh dill

Instructions

  • Be sure your cashews have soaked for several hours, or ideally, overnight. The longer they soak, the creamier your cream cheese will be. After soaking, drain and rinse the cashews.
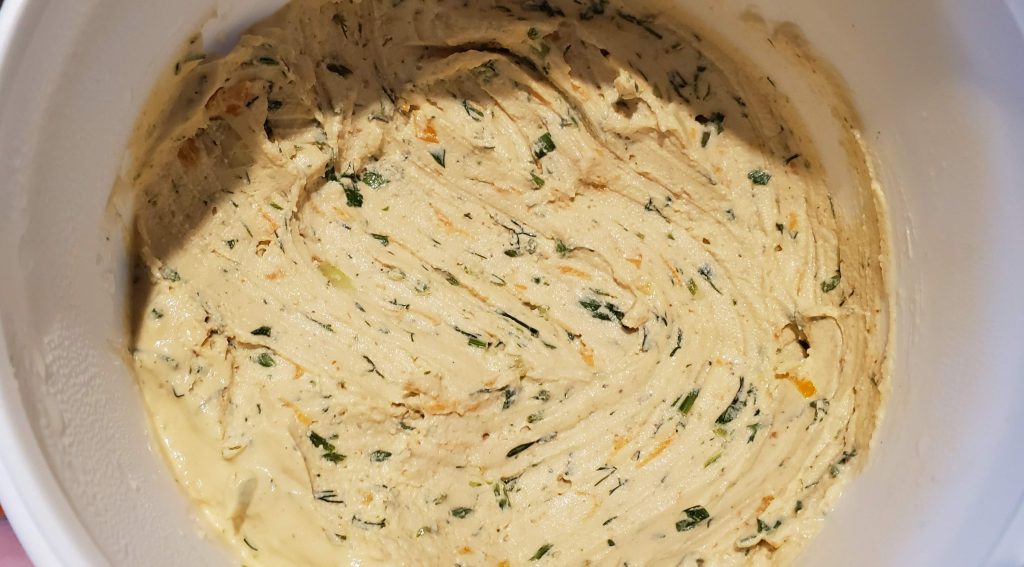
  • To the bowl of a food processor, add the soaked cashews, vinegar, lemon juice, salt, onion powder, paprika, and garlic powder. Start to process to break up the cashews. You'll need to stop the food processor and scrape down the sides frequently to keep the mixture moving. Add the water 1 tbsp at a time until it comes together into a smooth spread. Be patient as this could take 5-10 minutes.
  • Once it’s smooth, transfer to a mixing bowl and add the carrots, red pepper, green onion, parsley, and dill. Stir to combine.
  • Taste and adjust seasoning, adding more salt or a tiny splash of vinegar or lemon juice, if necessary.
  • Transfer the mixture to an airtight container and store in the fridge. It will set up and thicken slightly as it sits in the fridge and gets cold. You could eat it right away, but it’s better cold.

Notes

Don’t let the prep time for this recipe scare you. It’s all hands off, but the cashews must be soaked for SEVERAL hours, ideally overnight, to create a super smooth texture. In fact, your hands on time will only be about 10-15 minutes.
Plant-based-Bear.com Notes:
If you have a high speed blender, I’ve had success without soaking, but adding a bit more water. Remember that soaking will increase the mass of the cashews, so in my head I tried to figure out how many cashews, and how much water I think they might have absorbed. In my case, I was suddenly doubling a recipe I hadn’t planned on doubling, so added non-soaked cashews and about 4-5 T of extra water to let them absorb it. It worked perfectly.
In fact, I heartily recommend the high-speed blender.  Jenn’s food processor must be better than mine, as I really couldn’t ever seem to get the right consistency with the food processor alone, even while only using soaked cashews. So, I like my high speed blender to make sure everything gets creamy, but it can still take a few minutes.  I’d highly recommend doubling the recipe if using a large high speed blender though, as this should really help you get a creamy spread without near as much “scrape down.”  And, this spread is so amazing, you’ll easily eat double before it spoils!
I also recommend being quite generous on the last 5 ingredients, the veggies!  I haven’t gone wrong with having heaping tablespoons and 1/4 cups!
There also hasn’t been any need for me to “adjust” the flavoring at the end, but your taste may vary!
My spread has been orange-tinted and soupy when freshly-prepared, but after a sit in the refrigerator overnight, it seems to have a lighter color and tastes incredible!
Plant-based Garden Cream Cheese Spread
Plant-based Garden Cream Cheese Spread on a Pretzel Crisp!
Plant-based Garden Cream Cheese Spread
Plant-based Garden Cream Cheese Spread disappearing before my very eyes!
Plant-based Garden Cream Cheese Spread
The first attempt at this spread, but didn’t have any chips or bagels, so toasted sourdough had to do!
PBB
No-Oil Whole Wheat Bread

Bread Day!

This morning I woke up early and noticed a forlorn cup of aquafaba in the fridge. So, I decided to use it for another batch of my No-Oil Whole Wheat Bread! And, I think I have this down, finally. I’ve made 3 batches of whole wheat bread successfully that are amazing, full size, rise properly, and all that!

To me, these look so good that I think I’m gifting them to a couple of friends today (as I still have a loaf of fresh bread from the last batch!)

Canned bread for the win!

PBB
No-Oil Whole Wheat Bread
Fresh no-oil whole wheat canned bread!
Deep Dish Enchiladas

Deep Dish Enchiladas

Each day I want to take a healthy, plant-based lunch to work. Lunch is my main meal of the day, after a big breakfast, and virtually no dinner. So I don’t want so skimp out on making something hearty, tasty, and delicious! But, those time constraints!

So, again, in my typical “how-to” fashion, here’s an incredibly simple, but incredibly tasty, how-ya-do-it, as fast as making a sandwich, in a 4-cup Pyrex bowl.

Deep Dish Enchiladas

Easy dish for one for homemade lunches with a Mexican flair!
Last updated August 8, 2019.
Prep Time10 minutes
Cuisine: Mexican
Keyword: lunch
Author: Plant-Based-Bear.com

Equipment

  • 6" Pyrex Bowl

Ingredients

  • 5 corn tortillas
  • 1 can no-oil refried beans
  • 2 cups cooked rice any variety
  • 1 small can enchilada sauce or tomato sauce seasoned as you desire
  • pico de gallo or salsa optional
  • bell peppers diced, optional
  • plant-based cheese or cheese sauce shredded, optional
  • plant-based sour cream optional

Instructions

  • If using tomato sauce, prepare with some spices and seasonings that suit you. A little chili powder, salt, and diced bell peppers such should make it more exciting! No need to heat it, unless you want to heat up the bell peppers into the sauce to better spread flavor. Green chilies would work here too!
  • Add a little of the enchilada or tomato sauce (the sauce) to the bottom of the bowl. This is mostly so the tortilla doesn't want to stick!
  • Add a corn tortilla, flat in the bottom of your Pyrex bowl. It might be slightly larger than the bowl. These are usually naturally oil-free, and are shelf stable for a long time.
  • Layer refried beans (I do mine in clumps), rice, salsa, peppers, and more sauce. Add plant-based cheese or sauce in each layer, if desired.
  • Add another corn tortilla and repeat until the bowl is filled. I like to end with a corn tortilla on top, so things don't stick to the lid.
  • When time to eat, heat 4-6 minutes in the microwave. This is thick and heavy, so it takes awhile to heat. Bowl will be hot when removing from microwave.
  • Top with plant-based shredded cheese and sour cream!

Notes

Use a glass Pyrex bowl, as tomato-based sauces and plastic bowls don’t really work too well. We also need some depth here.
Because of splattering, use some sort of lid or paper towel. Don’t use the plastic Pyrex lids, as they’ll often melt and misshape with that much microwaving.  I eat at the office, so can usually find a paper plate or paper towel to cover during cooking!

In my Deep Dish Enchiladas for today, I had some corn I wanted to use up, and some pico de gallo. A dollop of quacomole would’ve been great, and the shredded cheese or sauce would have been nice too, but I didn’t have any fresh in my fridge. Nonetheless, these enchiladas really hit the spot and were amazing. Also, it’s hard to “overnuke” these in the microwave, as that seems to give them more of a “baked” consistency.

Yeah, I don’t know if I can really call these “enchiladas,” as I don’t know the first thing about authentic Mexican cuisine (except how to eat it!), but, they do use the same basic ingredients, I think, so I’m sticking with it! Don’t like it? Comment below!

PBB